Friday 13 December 2013

The Scent of Christmas

I thought I'd share a version of the scent of Christmas with you. This beautiful smell spreads throughout the house & gives such a lovely, warm & inviting aroma. There are many versions of this festive recipe, but this is the one I enjoy the most. It's also the easiest one for me, as I always have these ingredients in my kitchen.

Ingredients:
slices of lemon peel (you can use orange peel if you like)
whole cloves
cinnamon sticks
bay leaves
star anise
a little vanilla extract
boiled water


Add all ingredients to a saucepan & cover with boiled water (I boil my water in the kettle first, so the smell starts to spread immediately). Once the mixture starts to boil in the saucepan, reduce heat so it's down to a simmer.


Let it simmer but check it often & top up with water regularly.
I let mine simmer for about half an hour until the house is filled with the wonderful smell of Christmas, then I turn it off.


Let it cool in the saucepan.

Once it's cool, you can pour it into a jar & refrigerate it to keep it fresh, then you can use it again. 


It doesn't look very appealing but it smells divine.

I keep mine for about a week or so. After that, the ingredients don't look very fresh so I make up a new batch.


I hope you enjoy the sweet smell of Christmas.

Happy Christmas from me to you....


Saturday 7 December 2013

Christmas Tradition - Nativity Scene

Every Christmas I set up a kids' Nativity Scene, to encourage Little Miss to learn & understand the story of Christ's birth.


I bought this Fisher Price Nativity Scene from Kmart last year for about $30-$40 (I think).


Having wrapped 24 Christmas books to read throughout December, I put these in a basket & place them on the table with the Nativity Scene. I've numbered them with stickers from 1 to 24 &, although this is probably unnecessary, it's a good exercise for Little Miss to become familiar with numbers. The more she sees the numbers, the more she will recognise them.


The little notes are numbered 1 to 24 & they each have a simple quote from the bible regarding Jesus' birth. The 3 of us sit down together each night & read a quote first, then we unwrap one of the books to read.


Here are some of the quotes I've written down, some with stickers to make them interesting & easy to understand.


Little Miss seems to be enjoying the tradition. I hope we can continue it in years to come. As she gets older, I will change it around a little, to make sure I keep her interested. For now, the picture books are working & she seems to be understanding the story, which is exactly what I'm hoping for.


I hope you & your families are enjoying every moment together at this very special time of year.
Wishing you a wonderful December & a happy Christmas season.


Sunday 24 November 2013

Christmas Tradition - Reading Christmas books to Kids

It's been awhile since I've posted on my blog. With Christmas just around the corner, I was motivated to share a Christmas Tradition I started last year. I love celebrating Christmas so I hope this inspires you to start your own tradition at home.
Very simply, every night in December until Christmas Day, hubby, Little Miss (who is now aged 3) & I sit down near the Christmas Tree & read a Christmas book together. I try to make it extra special by wrapping the books as though they're gifts, so there's an element of surprise & anticipation for Little Miss. She loved unwrapping the books last year, so I hope this year will be just as exciting for her.

I store the books in a tub throughout the year.


Here are some of the books I have collected over time.
A couple of books are about Santa, but most are about the Nativity.


I wrap the books in Christmas paper, as though they're presents, & place them in a pretty basket (the basket was around $10 from Woolworths).


The books are now ready for December 1st.

Each night in December leading up to Christmas Day, before she goes to bed, Little Miss will unwrap a book & we'll read it together. It's such a simple idea, but you'd be pleasantly surprised at how much fun it is for a young child (toddler, preschooler & older primary school aged kids). As the years go by, I hope she'll continue to enjoy the absolute beauty of these small but memorable traditions.

I usually have a toy Nativity Scene set up near the books as well. As soon as I have put that together, I will share it in a separate post.

I hope this has inspired you to start a similar Christmas Tradition for your family.

Are there any Christmas Traditions you have in your home? If you'd like to share, I'd love to hear about it so please leave me a comment.


Sunday 14 April 2013

Organise a Toddler Wardrobe

It seems as though I'm re-arranging things in Miss S's wardrobe every few months. A good idea when you have a toddler who grows out of her clothes so quickly, but time-consuming sometimes. This little clean-up took about a half hour, so it was one of the quickest organising jobs I've done around the house.

Here is what her wardrobe looked like a month ago, coming up to the end of Summer.


It probably looks fairly neat & tidy but on closer inspection....


you can see the tshirts are almost overflowing (& getting squashed & wrinkled) & the clothes on the bottom 2 shelves had to be rolled up so they could fit (more wrinkles!).


Her shoes were in a drawer with the socks & tights.


This wasn't going to work with all the thick, warm clothes for Autumn/Winter that we needed to accommodate, so I  changed things around a little. This is what the wardrobe looks like now...


All the coats, cardigans & knitwear are now hanging on the top rail (coats to the left, cardigans & knits on the right),
with dresses, skirts & long-sleeved tops hanging on the bottom rail (skirts, then tops, then dresses L-R).


Miss S's Winter hats & scarves are top left, Summer hats & caps are top right.
Shoes are on the middle shelves & the white box in the front has her brushes, combs, hair detangler, lint remover & other bits.


One of the drawers now has all her leggings, jeans, shorts & tracksuit pants. I've folded them & "filed" them so everything is visible. It's practical so Miss S can see everything at a glance.
I'm encouraging Miss S to choose which colour pants she likes to wear. I'm finding that this is a good way to teach colours to a toddler!
There are a few rolled up leggings because they're the ones Miss S wears around the house (they're the ones that are damaged or have stains that I can't remove, so she can get as dirty as she likes in those ones!).


Another drawer has pyjamas & singlets.

The other drawer has her socks & Winter tights, & I've put her photo albums on one of the shelves.

A toddler girl's wardrobe is quite involved, as there are also accessories to consider. I've thought of a way to organise hair accessories & I'll hopefully share that in a post very soon.

Not bad for half an hour's work. It could be better but in about 6 months I'll be doing this again, so I can spend a bit more time on better organisation then.

How have you organised your toddler's wardrobe?

Thursday 31 January 2013

Zucchini Recipes

Zucchini is currently in season & my vegie patch is overflowing with them. I searched the internet & found some easy zucchini recipes that I could try. Here's what I found:

Feta & Zucchini Fritters
2 eggs
1/2 cup self-raising flour
2 tablespoons milk
3 medium sized zucchini, grated & squeezed of their juices
100g feta cheese, crumbled
1 tablespoon fresh thyme, chopped
1 garlic clove, crushed
vegetable oil, for frying

Combine eggs, flour & milk in a bowl, add zucchini, feta, thyme & garlic & stir to combine.
Heat a little oil in frying pan or use oil spray. Place 2 tablespoons of mixture into pan & flatten a little with a spatula to form round pancakes. Cook until golden brown on both sides & cooked through (a few minutes on each side). Transfer to a plate lined with absorbent paper towel.
Repeat until you've used up all the mixture. Keep spraying the pan with oil between batches.

A similar version of this zucchini fritter recipe is
Corn, Zucchini & Chickpea Fritters
The ingredients are different but the method is essentially the same:

1 can chickpeas, drained, rinsed & blended
1/2 cup milk
2 eggs
3/4 cup self-raising flour
1 large zucchini, grated & squeezed of it's juices
1 cup frozen corn kernels, rinsed to thaw, then blended
handful of grated tasty cheese
olive oil cooking spray

Whisk milk & eggs. Place flour in a bowl & whisk in milk mixture until smooth, then stir in chickpeas, zucchini, corn & cheese.
The rest is the same as above.


You can eat these fritters on their own, with a squeeze of lemon juice, as an accompaniment to a meal, as an afternoon snack for kids or you can put them in a sandwich with other fillings.


Zucchini, Corn & Feta Muffins
1 egg
220g plain flour
1 tsp baking powder
50g breadcrumbs
1/2 cup frozen corn kernels, rinsed to thaw, then blended
3/4 cup milk
3/4 cup vegetable oil
1 1/2 zucchini, grated & squeezed of it's juices
crumbled feta

Combine egg, oil & milk in a bowl. In a separate, larger bowl add flour, powder & breadcrumbs. Add egg mixture to dry ingredients & mix, then add zucchini, corn & feta & stir until just combined.
Line a muffin tray with paper muffin cases & add about 2 tablespoons of the mixture to each case.
Bake at 200C for about a 1/2 hour (the time may vary a little, depending on your oven. It takes me 1/2 an hour as I have an old gas oven with no fan. It should take less time if you have a fan-forced oven).
Cook until golden & cooked through.


All of these zucchini recipes are great for kids. Healthy, fresh & home-made (so you know exactly what's in them). Miss S loves them!


Bon appetite!


Thursday 8 November 2012

My Front Porch Makeover

I've always wanted to have a lovely front porch to sit on during warm Spring-Summer days but it's been a bit of a dream since we bought the house. Decorating the front porch has never been a priority. Since Little Miss became a toddler, I decided it was time to make it happen so we could sit out here together. This has been my project for the last few weeks & I've really enjoyed it.

This is what the porch looked like before:


very dull & boring. A blank canvas waiting to be transformed.


You can even see a glimpse of my outdoor thongs which I keep here for when I step outside.
Not a very inviting porch & not a great first impression of the house.


This is what the front porch looks like now:


Understated, practical & neutral.


I did a bit of searching for the bench, as I was determined to get a white one. It wasn't easy to find, as most are either plain timber or wrought iron. Thank goodness for my favourite store at the moment - Masters. Both the white bench & the outdoor rug were bought at Masters.

Details for the rest of the items:


wicker table/ottoman is from Early Settler (great for holding a cup of coffee or a magazine),
terracotta citronella candles are from Bunnings (to ward off the mozzies),
star candle holder is from Flower Power (for added ambience),
plastic tray with handles I had around the house (for holding flowers, magazines, candles, & to carry drinks & things in & out of the house),


fresh roses are from my garden,


outdoor cushions were a bargain buy from Flower Power,


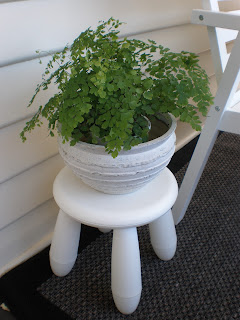
white plastic stool is from Ikea (doubles as another chair or small table),
fern is from Flower Power,
white flower pot I had around the house.

Of course, there's so much more that I could add to make it "pop" a bit more (colours, textures, plants, etc), but I decided to keep it classic & simple for now because I will be adding splashes of festive splendour for Christmas next month (hopefully that'll be a future blog post).

A welcoming porch gives a positive first impression to people when they arrive at your home (decorating your front porch when trying to sell your house is a big plus!). Little Miss & I sit out here on warm afternoons waiting for hubby to arrive from work. It's such a nice, cosy space for us & I love sitting out here. It's currently our favourite "room".

Have you done any mini projects at your house lately? Maybe you're getting a few things ready for Christmas. Feel free to share - I'd love to hear about it.


Saturday 3 November 2012

Baby Shower

Baby showers are sweet. Everyone is so happy for the mum-to-be & there's so much anticipation in the air. I was invited to one recently & had a lot of fun.
There were plenty of gifts for the bub in the tum,


 fun(ny) games,

(pin the dummy on the baby)


(guess the number of jellybeans in the jar)


scrumptuous food


(delicious white chocolate mud cake made by Samantha at "Cake Smitten")

&.....a fingerprint tree.

Here's another way to use the fingerprint tree (in my previous post it was used at an engagement party):


get all the guests at the baby shower to pick either blue ink or pink ink, depending on whether they think the baby will be a boy or a girl, & add their fingerprint to the fingerprint tree. Then they can put their name next to the fingerprint. It's a beautiful alternative to a guest book & a fun idea so that the mum-to-be can look at all the baby predictions on the tree. Also nice to pass on to the baby as a keepsake for them to have later on.

There was a 50/50 split on the predictions at this baby shower.


Upon leaving, we each received this gorgeous Thank You


with an ultrasound photo of the baby on the back.


A nice way to spend a Sunday afternoon.
Have you been to a baby shower recently? How much fun did you have?


Saturday 27 October 2012

Fingerprint Tree

I recently attended an engagement party for a lovely couple &, instead of a Guest Book, they had a Fingerprint Tree. This was the first time I had seen this, but I've recently also noticed it on Pinterest, so it's not a new idea - but a very creative one.

The idea is that you have a tree printed on a sheet of paper (A4 or A3 are a good size) & you also have an ink pad where guests can ink their finger, then apply their fingerprint somewhere on the tree. You then write your name next to the fingerprint & the couple are left with a beautiful memento of all the guests at their engagement. (Having a packet of wet wipes handy is a good idea, so guests can remove the ink afterwards).

Here's the Fingerprint Tree that I put my fingerprint on:


This is such a clever idea for many other special functions too, such as weddings, kitchen teas, baby showers, birthdays, christenings & so many more, where you might previously have used a Guest Book.

I think a fantastic idea would be to create a Family Tree similar to the Fingerprint Tree (I don't know if this has been done yet - it probably has). With the Family Tree, your family members can put their fingerprints on the tree & then you can frame it & hang it on the wall in your home, along with your family photos.

It's beautiful. What do you think of the Fingerprint Tree? Do you like it as much as I do?


Monday 27 August 2012

Storing your Batteries

I saw this great idea on Pinterest & thought I'd do it for myself, & share. Definitely not a new idea, but a very practical one for organising your batteries.


This is how I have been storing my batteries (in an old paper bag from a store):


I removed all the batteries from their packaging:


& placed them in this very handy container:


They're so much easier to access now, & I know when I'm running out so I can buy more.


I had this container lying around the house, but you can buy similar containers with compartments at Howard's Storage World & Ikea.
You can also use this type of container to store buttons, tea bags, kids craft supplies, nails & screws, makeup, hair clips & so much more.


Do any of you have any practical ideas like this that you'd like to share?